Easy Raspberry Thumbprint Cookies: A Classic, Buttery & Jam-Filled Delight
Easy raspberry thumbprint cookies are truly the best treat for any occasion, combining timeless charm with irresistible flavor. With a wonderfully soft, rich, and buttery cookie base, perfectly complemented by a sweet and slightly tart raspberry filling, they are sure to be an instant hit with everyone who tries them. Dusted generously with a delicate cloud of powdered sugar, these delightful cookies will quickly become a cherished family favorite, bringing smiles and warmth to every gathering. Their simple elegance and delicious taste make them perfect for holiday trays, afternoon tea, or simply as a comforting snack.

table of contents
Toggle
About These Classic Raspberry Thumbprint Cookies
Today, I’m thrilled to share a recipe that holds a truly special place in my heart: these delightful raspberry thumbprint cookies. More than just a simple dessert, these little treats are a sweet journey back in time, evoking cherished memories and comforting nostalgia with every bite. Their combination of a tender, buttery base and a vibrant, fruity filling makes them an irresistible classic.
I distinctly remember visiting my grandmother during the holiday season, long before I settled in Colorado. Our special tradition was to go out for a ladies’ tea, a sophisticated affair complete with dainty teacups, tiered trays, and, almost always, these exquisite raspberry thumbprint cookies gracing the elegant, lacy tablecloths. The tiny tea room, filled with gentle chatter and the aroma of freshly brewed tea, was a magical place.
While the adults carefully selected their teas (I, being a child, was rarely interested in more than a sip or two), my focus was always on finding one of these perfect cookies. I’d gently pluck one from the tray and begin to nibble. The way the melt-in-your-mouth shortbread dough dissolved on my tongue, perfectly contrasting with the bright, sweet-tart burst of raspberry jam, all finished with a delicate dusting of powdered sugar, was simply the ideal treat. It was pure bliss.
Even now, whenever I bake these cookies, my thoughts instantly drift to those wonderful afternoon tea parties with my grandmother. The simple act of making them fills my kitchen with a warmth that goes beyond just the oven’s heat. These days, I enjoy my cup of tea at my desk, but it’s always made infinitely better when accompanied by one of these homemade raspberry thumbprint cookies.
The perfect harmony of buttery shortbread and the vibrant, sweet-tart pop of raspberry jam creates a truly comforting and nostalgic experience. And I can assure you, they taste just as phenomenal today as they did in my childhood memories. They’re a testament to classic baking, proving that some recipes are truly timeless.
Perhaps the best part about these thumbprint cookies is how surprisingly simple they are to make. The process is quite straightforward, and shaping the little indents for the jam is actually quite fun – it always brings back fond memories of playing with Play-Doh as a kid. This recipe is perfect for bakers of all skill levels, offering a rewarding experience that results in truly delicious, crowd-pleasing cookies.
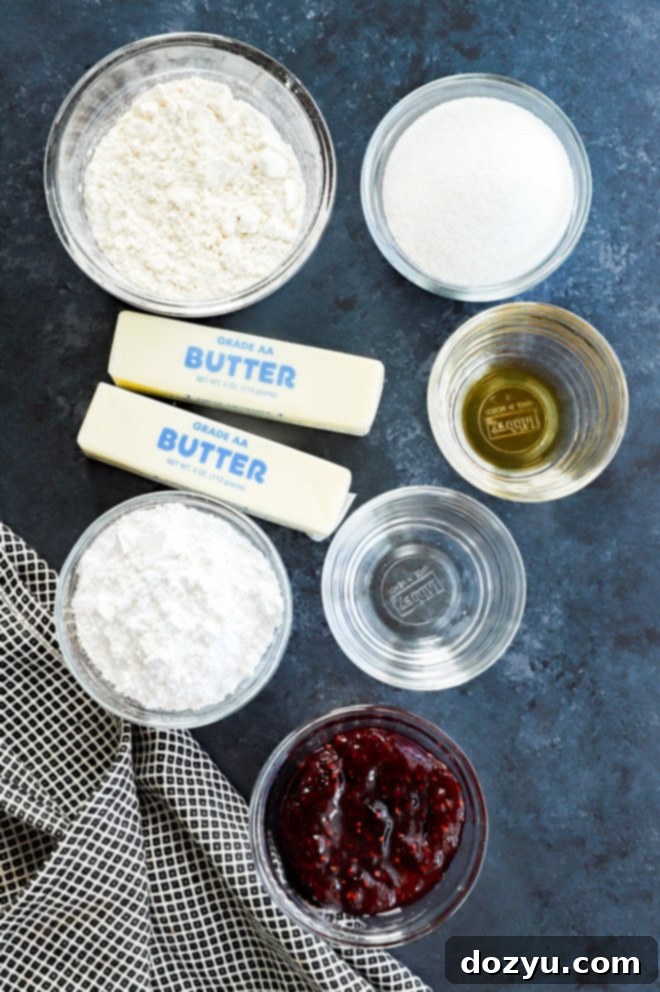
Essential Ingredients for Raspberry Thumbprint Cookies
To create these delightful raspberry thumbprint cookies, you’ll need a few key ingredients. Each plays an important role in achieving the perfect buttery texture and sweet-tart flavor profile:
- Unsalted Butter: This is the star of our buttery shortbread base. Always use unsalted butter to control the overall salt content in your baking. It’s crucial that the butter is at room temperature before you begin, as this allows it to cream properly with the sugar, creating a light and airy dough. If salted butter is all you have on hand, simply omit the pinch of salt called for in the recipe.
- Granulated Sugar: Regular white granulated sugar is ideal for this recipe. It provides sweetness and helps to create the tender crumb characteristic of shortbread cookies. Its fine crystals dissolve beautifully into the butter.
- Vanilla Extract and Almond Extract: A combination of these two extracts provides a wonderfully complex and aromatic flavor to the cookie dough. Vanilla adds warmth and classic sweetness, while almond extract gives a subtle, sophisticated nutty undertone that pairs beautifully with raspberry. Don’t skip the almond extract; it truly elevates the flavor!
- Fine Kosher Salt: Just a pinch of fine kosher salt is enough to balance the sweetness of the cookies and enhance all the other flavors. Salt is essential in baking to prevent desserts from tasting flat.
- All-Purpose Flour: Your favorite brand of all-purpose flour will work perfectly here. It provides the structure for the cookie dough. For the best results, always measure flour correctly by stirring it first, then spooning it into your measuring cup and leveling it off. This prevents over-measuring, which can lead to dry, crumbly cookies.
- Raspberry Jam or Preserves: The vibrant filling! While raspberry jam is traditional and highly recommended for its sweet and tart flavor, you can also use raspberry preserves. Some bakers prefer seedless jams for a smoother texture, but I personally find the slight texture of seeds in preserves adds a lovely rustic touch. Choose a good quality jam for the best flavor impact.
- Confectioners’ Sugar (Optional): A light dusting of confectioners’ sugar (also known as powdered sugar) after baking adds a beautiful, elegant finish and an extra touch of sweetness. It’s entirely optional but highly recommended for that classic thumbprint cookie look.
Key Equipment for This Recipe
Having the right tools can make the baking process much smoother and more enjoyable. For these raspberry thumbprint cookies, here are the essential pieces of equipment you’ll need:
- Stand Mixer with Paddle Attachment: This is our preferred tool for making the cookie dough. A stand mixer makes creaming the butter and sugar quick and effortless, ensuring a consistently smooth and well-aerated dough. The paddle attachment is ideal for mixing cookie dough as it incorporates ingredients thoroughly without overworking them.
- Large Bowl and Electric Hand Mixer: If you don’t have a stand mixer, a large mixing bowl and an electric hand mixer will work just as well. Just be sure to scrape down the sides of the bowl frequently to ensure all ingredients are evenly combined.
- Half Sheet Baking Pan: You’ll need at least one, possibly two, half sheet baking pans to bake your cookies. These provide ample space for the cookies to bake without crowding.
- Silicone Baking Mat or Parchment Paper: To ensure your cookies don’t stick and bake evenly, line your baking sheets with either a silicone mat or parchment paper. This also makes for easier cleanup!
- Wire Cooling Rack: After baking, cookies need to cool completely to set their shape and texture. A wire rack allows air to circulate around the cookies, preventing them from becoming soggy on the bottom.
- Cookie Scoop (Optional but Recommended): While not strictly a “must-have,” a 1 1/2-inch cookie scoop makes portioning out the dough incredibly easy and ensures your cookies are uniform in size, which helps them bake evenly. Consistency is key for perfect batches!
How to Make Raspberry Thumbprint Cookies: Step-by-Step Guide
Making these classic raspberry thumbprint cookies is a delightful and straightforward process. Follow these steps for perfect, tender, and delicious results:
Prepare the Buttery Cookie Dough
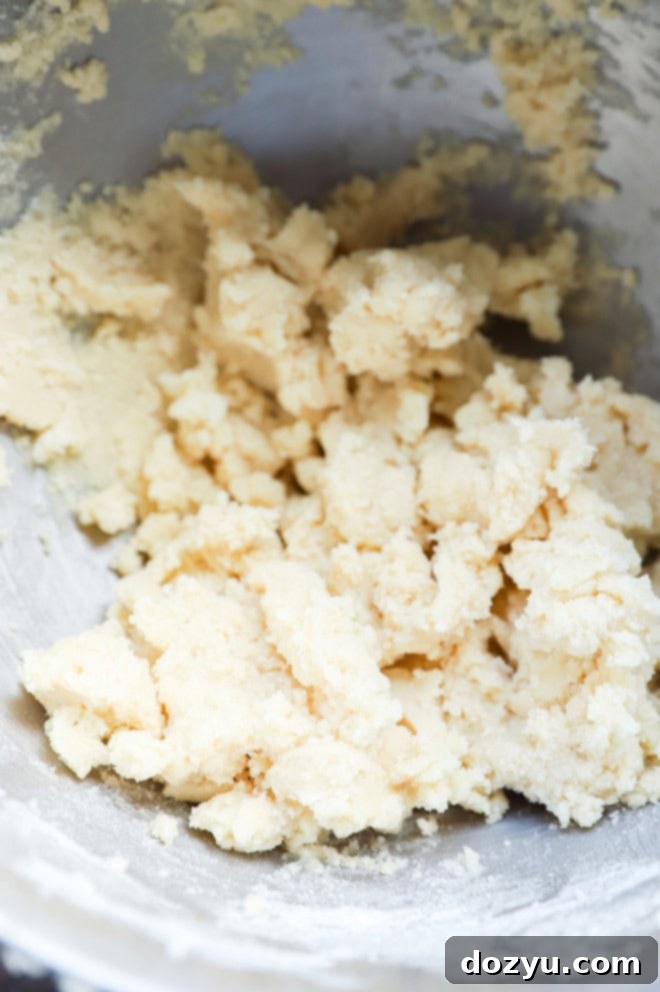
Begin by creaming together your room-temperature unsalted butter and granulated sugar in the bowl of a stand mixer, fitted with the paddle attachment. Beat them on medium speed until the mixture is light, fluffy, and creamy, which usually takes about 2-3 minutes. This step is crucial for incorporating air and achieving a tender cookie texture. Next, beat in the almond extract and vanilla extract until they are fully combined and fragrant. Finally, add the pinch of salt and gradually incorporate the all-purpose flour, mixing on low speed until just combined. Be careful not to overmix the dough, as this can lead to tough cookies. The dough should come together but still be slightly crumbly.
Chill the Dough for Perfect Texture
Once your dough is prepared, cover the bowl tightly with plastic wrap and place it in the refrigerator. Chill the dough for at least 1 hour. This chilling period is absolutely essential for several reasons: it allows the butter to firm up, preventing the cookies from spreading too much during baking, and it also allows the flavors to meld beautifully. A well-chilled dough will result in perfectly shaped, buttery, and melt-in-your-mouth thumbprint cookies.
Shape, Fill, and Prepare for Baking
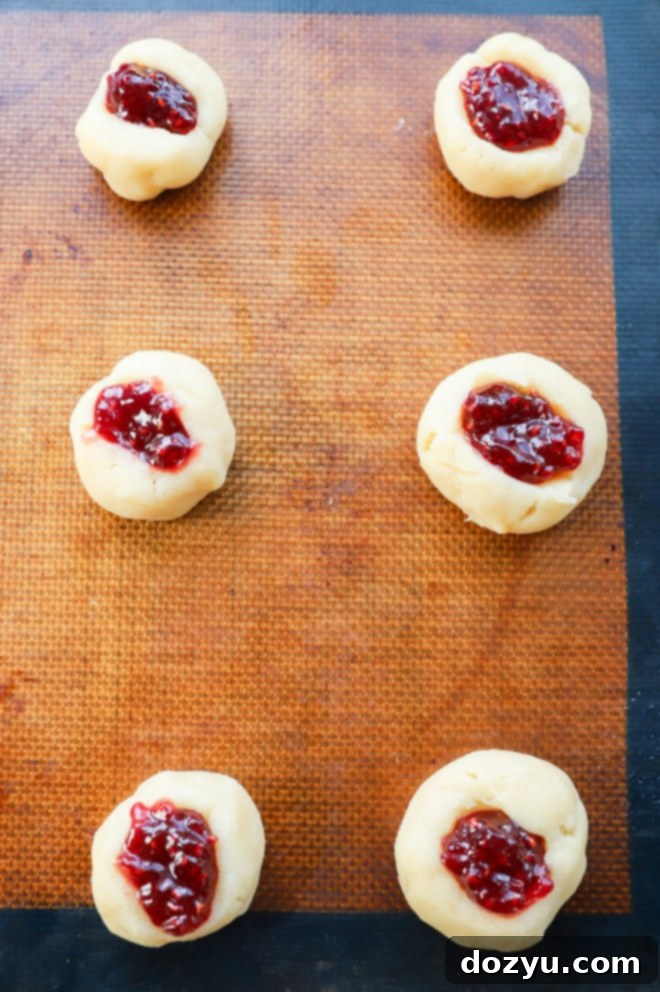
After the dough has chilled sufficiently, preheat your oven to 350°F (175°C) and line a baking sheet with parchment paper or a silicone mat. Take small portions of the dough, about 1 1/2-inches in diameter (a cookie scoop is excellent for consistent sizing), and roll them into smooth balls between your palms. Place these dough balls on your prepared baking sheet, ensuring they are spaced about 2 inches apart to allow for slight spreading. Using your thumb or the back of a small measuring spoon, gently make a distinct dent in the center of each ball. Be careful not to press all the way through. Fill each of these depressions with about 1/2 teaspoon of your favorite raspberry jam. You can use a small spoon or even a piping bag for neater filling.
Bake to Golden Perfection
Carefully transfer the baking sheet to your preheated oven. Bake the cookies for 14 to 16 minutes, or until the edges are just lightly golden brown. The centers of the cookies should appear set. Overbaking can make them dry, so keep a close eye on them. Once baked, remove the cookies from the oven and let them cool on the cookie sheet for about 5 minutes. This allows them to firm up slightly before you move them. After 5 minutes, carefully transfer the warm cookies to a wire cooling rack to cool completely. For an extra touch of sweetness and a beautiful presentation, dust the cooled cookies with a delicate sprinkle of confectioners’ sugar (this step is optional but highly recommended for that classic look!). Now, they’re ready to enjoy!
Expert Tips and Tricks for Perfect Thumbprint Cookies
Achieving bakery-quality raspberry thumbprint cookies at home is easier than you think with a few smart tips and tricks:
- Measure Your Flour Correctly: This is perhaps one of the most crucial baking tips! Incorrect flour measurement can significantly alter the texture of your cookies. To ensure accuracy, do not scoop flour directly from the bag with your measuring cup. Instead, fluff up the flour in its container with a spoon or whisk, then lightly spoon the flour into your dry measuring cup until it overflows. Finally, level it off with the straight edge of a knife or spatula. This “spoon and level” method prevents compacting the flour, which can add too much to your recipe, leading to dry and dense cookies.
- Don’t Skip Chilling the Dough: I cannot emphasize this enough! Chilling the dough for at least 1 hour (or even longer) is vital. If your dough is too warm, the butter in the shortbread will melt too quickly in the oven, causing your cookies to spread excessively and lose their characteristic round shape and distinct thumbprint indent. A properly chilled dough maintains its structure, resulting in those wonderfully buttery, soft, and perfectly shaped cookies you desire.
- Alternative Fillings: While raspberry jam is a traditional and delicious choice, don’t limit yourself! These versatile thumbprint cookies can be filled with various delightful options. Consider using other fruit jams like apricot, strawberry, or blackberry for different flavor profiles. For a decadent twist, you can also fill these cookies with melted chocolate or caramel. If you opt for chocolate or caramel, we recommend baking the cookies without filling them first. Once the cookies are cooled, then fill the indents with your melted chocolate or warm caramel, and allow them to set before enjoying. This prevents the chocolate or caramel from burning or becoming too hard during baking.
- Prevent Cracks When Making Indents: If your cookie dough is a little too firm from chilling, it might crack when you make the thumbprint indent. To prevent this, gently roll the dough balls between your palms for a few seconds to warm them slightly before pressing. If cracks still appear, simply smooth them out with your fingers before adding the jam.
- Keep an Eye on Baking Time: Thumbprint cookies are best when they are just barely golden at the edges, indicating they are cooked through but still tender. Overbaking can lead to dry, hard cookies. Keep a close watch, especially during the last few minutes, as oven temperatures can vary.
- Powdered Sugar Dusting: For the prettiest presentation and an extra touch of sweetness, dust the cooled cookies with confectioners’ sugar. Use a fine-mesh sieve for an even, delicate coating. This step truly gives them that classic, elegant finish.
More tasty cookie recipes to try out: Chewy Peanut Butter Cookies | Dark Chocolate Coffee Cookies | Cookie Dough Bites | Chocolate Covered Oreos

Can I Use Other Types of Jam for My Thumbprint Cookies?
Absolutely! While raspberry jam is a beloved classic for these thumbprint cookies, the beauty of this recipe lies in its versatility. You are encouraged to experiment with your favorite flavors of jam or preserves to personalize your cookies. Imagine the vibrant sweetness of apricot jam, the rich tang of strawberry, the deep notes of blackberry, or even a zesty lemon curd for a brighter profile. The buttery shortbread base provides a perfect canvas for almost any fruit filling. Just ensure your chosen jam or preserve is thick enough not to spread too much during baking. This is a wonderful way to tailor these delightful treats to your taste preferences or to create a varied cookie platter for holidays and special occasions.
How to Make Gluten-Free Raspberry Thumbprint Cookies?
Yes, you can absolutely enjoy these delicious thumbprint cookies even if you follow a gluten-free diet! Making this recipe gluten-free is quite simple. The key is to substitute the all-purpose flour with a high-quality gluten-free 1:1 ratio flour blend. Many excellent blends are available on the market today that are specifically designed for baking and can be swapped cup-for-cup with regular flour without needing additional modifications. Beyond the flour, also make sure to check the labels of your chosen jam or preserves to ensure they are certified gluten-free. With these simple adjustments, you can bake a batch of tender, flavorful gluten-free raspberry thumbprint cookies that everyone can enjoy!
How Long Do Raspberry Thumbprint Cookies Stay Fresh?
When stored properly, these delightful raspberry thumbprint cookies maintain their freshness and delicious taste for a good amount of time. To ensure they stay at their best, store them in an airtight container at room temperature. Kept this way, they will typically last for up to 1 week. For optimal freshness and texture, especially if you enjoy them with a soft, buttery crumb, it’s always best to consume them within the first few days. Beyond a week, while still safe to eat, their texture might become a little firmer.
Can Raspberry Thumbprint Cookies Be Frozen?
While these cookies are truly best enjoyed fresh from the oven, you can definitely freeze the cookie dough ahead of time, which is a fantastic way to prep for future baking sessions. Freezing the baked cookies themselves can sometimes alter the texture of the jam, making it a little watery upon thawing. Therefore, the best approach is to freeze the cookie dough before baking.
To freeze the dough, form it into 1 1/2-inch balls as described in the recipe, but do not make the thumbprint divet or add the jam yet. Place these dough balls on a parchment-lined baking sheet and transfer them to the freezer until they are frozen solid, usually about 1-2 hours. Once firm, you can transfer the frozen dough balls to an airtight container or a freezer-safe bag. They will keep well in the freezer for up to 3 months.
When you’re ready to bake, thaw the desired number of frozen cookie dough balls overnight in the refrigerator. Once thawed, you can then proceed with shaping them by making the thumbprint dent, filling them with jam, and baking according to the instructions. This method allows you to have freshly baked thumbprint cookies whenever a craving strikes!
Need some inspiration for cookies? Check out my cookies recipe page!

What to Serve with Raspberry Thumbprint Cookies
Raspberry thumbprint cookies are a wonderfully versatile treat that pairs beautifully with a variety of beverages and occasions. Their melt-in-your-mouth texture and the ideal blend of sweet butter and tart fruit make them a delightful accompaniment to many things.
For a cozy moment, serve them with a freshly brewed cup of coffee, where the robust flavor complements the sweetness of the jam. They are also absolutely perfect with a traditional cup of tea, evoking that classic afternoon tea experience. If you’re looking for something comforting, a warm mug of hot chocolate creates a luxurious pairing, especially during cooler months.
These cookies truly shine on a cookie tray or dessert platter. During the holidays or any festive gathering, arranging them alongside a variety of other cookies creates an impressive and inviting spread for an after-dinner celebration. Their vibrant red centers and delicate powdered sugar dusting add a beautiful pop of color and elegance to any assortment. Consider adding them next to other holiday favorites for a balanced selection of textures and flavors. They are sure to be a beloved addition to any sweet spread, leaving guests reaching for just one more.
Proper Storage for Your Delicious Cookies
Ensuring your raspberry thumbprint cookies stay fresh and delicious is key to enjoying them for as long as possible. Here’s how to store them effectively:
Store Baked Cookies:
Once your jam thumbprint cookies have completely cooled, transfer them to an airtight container. Store this container at room temperature, away from direct sunlight or heat sources. When stored correctly, these cookies will maintain their delightful flavor and soft texture for up to 1 week. To prevent the powdered sugar from getting soggy if you’ve already dusted them, you might consider dusting them just before serving or adding a piece of parchment paper between layers if stacking.
Freeze Cookie Dough (Unbaked):
If you prefer to prepare ahead or want fresh cookies on demand, freezing the dough is an excellent option. Crucially, do this before shaping the shortbread cookies with the divet and adding the jam. Form the dough into 1 1/2-inch balls. Place these balls on a baking sheet lined with parchment paper, ensuring they don’t touch, and freeze until they are completely solid. Once firm, transfer the frozen dough balls to a freezer-safe bag or an airtight container. This helps prevent freezer burn and keeps the dough fresh for up to 3 months.
Thaw Frozen Cookie Dough:
When you’re ready to bake a fresh batch, simply remove the desired number of cookie dough balls from the freezer and place them in the refrigerator to thaw overnight. Once thawed, the dough will be ready to work with. Proceed to shape them, create the thumbprint indent, fill with raspberry jam, and bake according to the instructions in the recipe card. This method ensures you can enjoy warm, homemade thumbprint cookies with minimal effort whenever you wish.
More Easy Cookie Recipes to Explore
If you loved making these raspberry thumbprint cookies, you’re in for a treat with these other easy and delicious cookie recipes:
- Snowball Cookies: These melt-in-your-mouth cookies are wonderfully nutty, often made with pecans or walnuts, and generously dusted with powdered sugar for a perfect, snow-like finish. They’re a holiday classic that’s simple to make and always a crowd-pleaser.
- Cranberry White Chocolate Oatmeal Cookies: These chewy, comforting cookies are always a favorite in our home! Packed with hearty oats, sweet dried cranberries, and creamy white chocolate chips, they offer a delightful blend of textures and flavors that will remind you of home.
- Mini Chocolate Chip Cookies: Sometimes, smaller is better! These adorable mini chocolate chip cookies are not just a perfect dessert but also an ideal snack. Their bite-sized nature makes them incredibly addictive – you’ll want to eat them by the handful!
- Chocolate Covered Oreos: While not strictly a baked cookie, these are an incredibly easy and fun no-bake treat that’s always a hit! Take classic Oreo cookies and dip them in melted chocolate for an irresistible, customizable dessert that’s perfect for parties or gifting.

Finally, if you make this raspberry thumbprint cookie recipe, please be sure to give this recipe a star recipe rating on the recipe card and/or leave a comment! Your feedback means the world to me. I truly love to hear when you all make recipes, and I make it a point to take the time to respond to every single comment and question. It’s incredibly rewarding to know these recipes are being enjoyed in your homes!
Feel free to drop any questions below in the comments section – I’m always happy to help!
Oh, and be sure to tag me on Instagram, Facebook, or Pinterest if you make the recipe! I absolutely love being able to see these recipes come to life in your kitchens – it’s genuinely my favorite thing to look through those beautiful photos. It really means the world to me to see your culinary creations!
Want to be the first to know when I come out with a new recipe or get the latest news and baking tips? Sign up for my exclusive newsletter! You’ll get all the delicious updates delivered straight to your inbox.

Raspberry Thumbprint Cookies Recipe Card
Equipment List
-
Stand Mixer
-
Silicone Baking Mats
-
Half Sheet Pan
-
3-Tier Cooling Rack
Ingredients List
- 1 cup unsalted butter softened
- 2/3 cup granulated sugar
- 1/2 tsp almond extract
- 1 1/2 tsp vanilla extract
- Pinch of fine kosher salt
- 2 1/4 cups all-purpose flour
- 1/2 cup raspberry jam
- Confectioners’ sugar optional, for dusting
Step-by-Step Instructions
-
In the bowl of a stand mixer fitted with a paddle attachment, beat together the softened butter and granulated sugar until light, creamy, and fluffy (about 2-3 minutes). Incorporate the almond extract and vanilla extract, beating until they are well combined. Add the pinch of fine kosher salt and gradually add the all-purpose flour, mixing on low speed until the dough just comes together. Be careful not to overmix, as this can result in tough cookies.
-
Cover the bowl with plastic wrap and chill the dough in the refrigerator for at least 1 hour. This step is crucial to prevent the cookies from spreading too much during baking and helps the flavors develop.
-
Preheat your oven to 350°F (175°C) and line a baking sheet with parchment paper or a silicone mat. Take the chilled dough and form it into 1 1/2-inch balls (a cookie scoop works well for this). Place the balls on the prepared baking sheet, spacing them about 2 inches apart. Use your thumb or the back of a small measuring spoon to gently make a dent in the center of each dough ball. Carefully fill these dents with about 1/2 teaspoon of raspberry jam.
-
Bake the cookies for 14 to 16 minutes, or until their edges are just lightly golden brown and the centers appear set. Remove from the oven and let them cool on the cookie sheet for 5 minutes. This allows them to firm up before handling. Afterward, transfer the cookies to a wire cooling rack to cool completely.
-
Once completely cooled, dust the raspberry thumbprint cookies with confectioners’ sugar, if desired, for a beautiful finish and an extra touch of sweetness. Serve and enjoy your homemade classic treats!
