Irresistibly Crispy Cheese Corn Balls: The Ultimate Cheesy Snack Recipe
These delightful cheese corn balls are the perfect snack for any occasion, offering an irresistible combination of creamy corn and gooey melted cheese. Crafted with fresh sweet corn, mashed potato, and a harmonious blend of aromatic herbs and spices, each golden ball promises a satisfying crunch on the outside and a wonderfully tender, flavorful center. Whether you prefer them deep-fried to golden perfection, air-fried for a lighter touch, or baked until beautifully crisp, this recipe delivers a crowd-pleasing appetizer that’s both easy to make and utterly delicious.

Table of Contents
Toggle
About These Cheese Corn Balls
The inspiration for these incredible cheese corn balls comes from a memorable meal during a rainy weekend getaway in Ohio’s Hocking Hills. After a power outage left us without cooking options at our cabin, we ventured into the nearest small town. It was there, at a charming local restaurant, that the hostess enthusiastically recommended their famous cheese corn balls. Skeptical but adventurous, we ordered them, and to our delight, they were absolutely phenomenal. This unexpected discovery opened my eyes to a whole new world of savory, fried goodness.
These particular cheese corn balls strike the perfect balance: a wonderfully crispy exterior gives way to an irresistibly tender and creamy interior. The foundation of this delectable snack is a simple yet potent mixture of perfectly mashed potato, fresh, sweet corn kernels, rich shredded cheese, and a carefully selected blend of spices. What makes this recipe truly convenient is the option to use an Instant Pot for cooking both the potato and corn in a fraction of the traditional time, eliminating the wait for boiling water. This quick-cooking method ensures you get to enjoy these golden delights sooner!
Despite being a fried appetizer, this recipe for cheese corn balls offers a satisfying experience without feeling excessively heavy. The delightful lightness of the creamy center beautifully complements the crispy, golden-brown crust, making it an ideal appetizer or snack that truly hits the spot for any gathering or a cozy night in.

Ingredients for Cheese Corn Balls
Crafting the perfect cheese corn balls begins with selecting high-quality ingredients. Here’s a breakdown of what you’ll need and why each component is crucial:
- Potato: The backbone of these delightful balls, a large russet potato provides the ideal fluffy texture when mashed, creating a smooth and creamy base. Russets are known for their starchiness, which helps bind the mixture beautifully. Alternatively, you can use 3 to 4 Yukon Gold potatoes for a slightly creamier and richer consistency. Ensure your potato is peeled and thoroughly cooked until tender before mashing.
- Corn: For the most vibrant flavor and satisfying texture, fresh sweet corn on the cob is highly recommended. Its natural sweetness and crispness truly elevate the dish. However, if fresh corn isn’t in season or readily available, both frozen and canned corn are excellent alternatives. Just be sure to refer to the FAQ section below for specific preparation instructions to ensure the best results with these options, as proper draining is key.
- Cheese: Shredded mozzarella cheese is the star for its incredible melting capabilities and mild, creamy flavor, creating that irresistible gooey center. Its stretchiness adds to the fun of eating these balls. While mozzarella is a fantastic choice, don’t hesitate to explore other cheese options outlined in the FAQs for different flavor profiles and melting textures.
- Spices: A thoughtful blend of spices infuses these corn balls with depth and warmth. You’ll need freshly ground black pepper and salt to taste, along with dried oregano, garlic powder, dried basil, and red pepper chili flakes. The chili flakes offer a subtle kick that can be adjusted to your preference, adding a delightful complexity to the sweet corn and savory potato.
- Flour: All-purpose flour acts as a crucial binding agent, helping the mixture hold its shape. It ensures the balls stay intact during frying, preventing them from crumbling. For those with dietary restrictions, a gluten-free 1:1 ratio flour can be seamlessly substituted without compromising the texture.
- Bread Crumbs: Plain bread crumbs provide the signature crispy coating that makes these cheese corn balls so addictive. They create a beautiful golden crust when fried. For an extra layer of flavor, Italian bread crumbs, seasoned with herbs, are a wonderful alternative. Gluten-free bread crumbs are also an option to make this recipe accessible to everyone.
- Oil: For achieving that perfect deep-fried crispness, canola oil is a preferred choice due to its high smoke point and neutral flavor. Vegetable oil is another excellent and commonly used alternative for deep frying. The key is to use enough oil to fully submerge the balls, ensuring even cooking and browning.
Essential Equipment for This Recipe
To make the process of preparing these cheese corn balls as smooth and efficient as possible, having the right kitchen tools on hand is essential:
- Electric Pressure Cooker or Instant Pot: An Instant Pot, such as the Instant Pot Duo or Instant Pot Ultra, is incredibly useful for quickly cooking the corn cob and potato. It significantly cuts down on prep time, making this recipe even more accessible. For an even more advanced model, consider the Instant Pot Max.
- Mixing Bowls: You’ll need a set of various sizes for combining ingredients, mashing potatoes, and preparing the breading station.
- Measuring Spoons: Accurate measurements, especially for spices, ensure a perfectly balanced flavor profile.
- Wooden Spoon or Sturdy Spatula: Essential for mixing the corn ball mixture until all ingredients are well incorporated.
- Heavy Duty Pot (like a Dutch Oven): A robust pot is crucial for deep frying. A Dutch oven is ideal as its heavy bottom distributes heat evenly and maintains a consistent oil temperature, which is key for perfectly fried results.
- Spider Strainer: This tool is indispensable for safely and easily removing the delicate cheese corn balls from the hot oil, allowing excess oil to drain away before transferring them to paper towels.


How to Make Homemade Cheese Corn Balls
Making these crispy, cheesy corn balls is a straightforward process that yields incredibly satisfying results. Follow these steps for perfect homemade goodness:
Cook Corn and Potato
Begin by preparing your foundational ingredients. Pour 2 cups of water into the bottom of your electric pressure cooker or Instant Pot insert. Place the trivet inside, then carefully set the peeled potato and corn cob on top. Secure the lid and cook on high pressure for 15 minutes. Once cooking is complete, allow the pressure to naturally release for 5 minutes, then manually release any remaining pressure. This method ensures both the potato and corn are perfectly tender and ready for mashing and mixing.
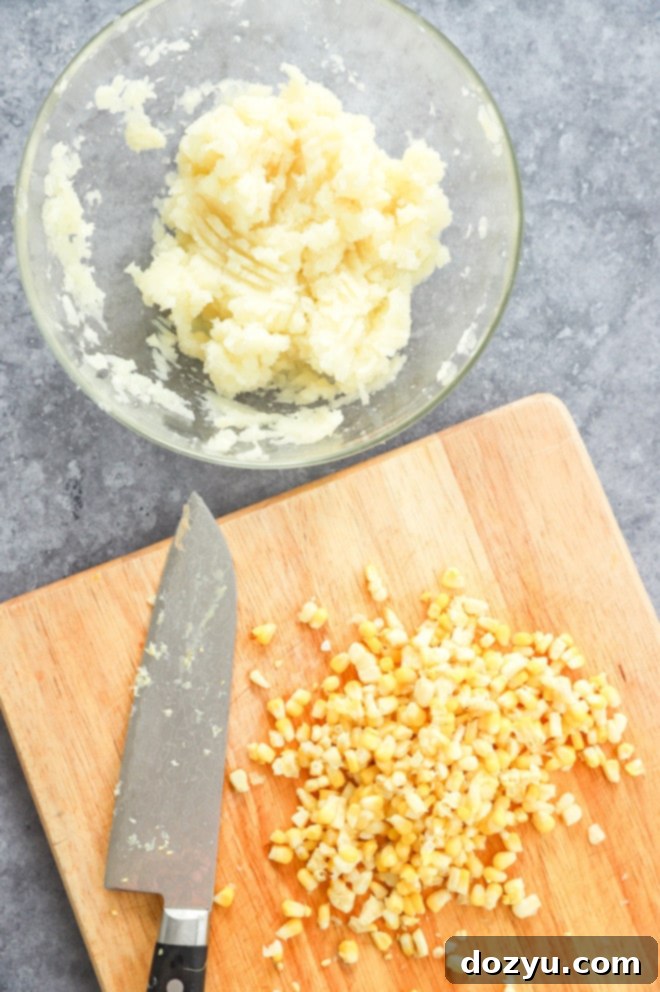
After cooking, remove the potato and corn and let them cool until they are comfortable to handle. In a large mixing bowl, thoroughly mash the potato until smooth. This creamy base is crucial for the texture of your corn balls. With a sharp knife, carefully slice the corn kernels off the cob and set them aside.
Prepare the Corn Ball Mixture
Now, it’s time to assemble the flavorful core of your cheese corn balls. Add the cooked corn kernels to the bowl with the mashed potato. Next, incorporate the shredded mozzarella cheese, black pepper, salt, dried oregano, garlic powder, dried basil, and red pepper chili flakes. Sprinkle in the all-purpose flour, which acts as a binder. Stir all these ingredients together meticulously until they are evenly mixed and form a cohesive dough-like consistency. This ensures every bite is packed with balanced flavor.
While you’re preparing the mixture, begin heating your frying oil. Pour enough oil into a heavy-duty pot or Dutch oven to reach a depth of about 3 inches. Heat the oil over medium-high heat, carefully monitoring the temperature until it reaches between 350˚F and 375˚F. An accurate kitchen thermometer is highly recommended for maintaining the ideal frying temperature.
Form the Balls
As the oil comes to temperature, begin shaping your corn balls. For easier handling and to prevent the mixture from sticking, lightly grease your hands with a little olive oil or cooking spray. Take portions of the corn mixture and roll them between your palms to form uniform balls, approximately 1 to 2 inches in diameter. Consistency in size helps ensure even cooking.
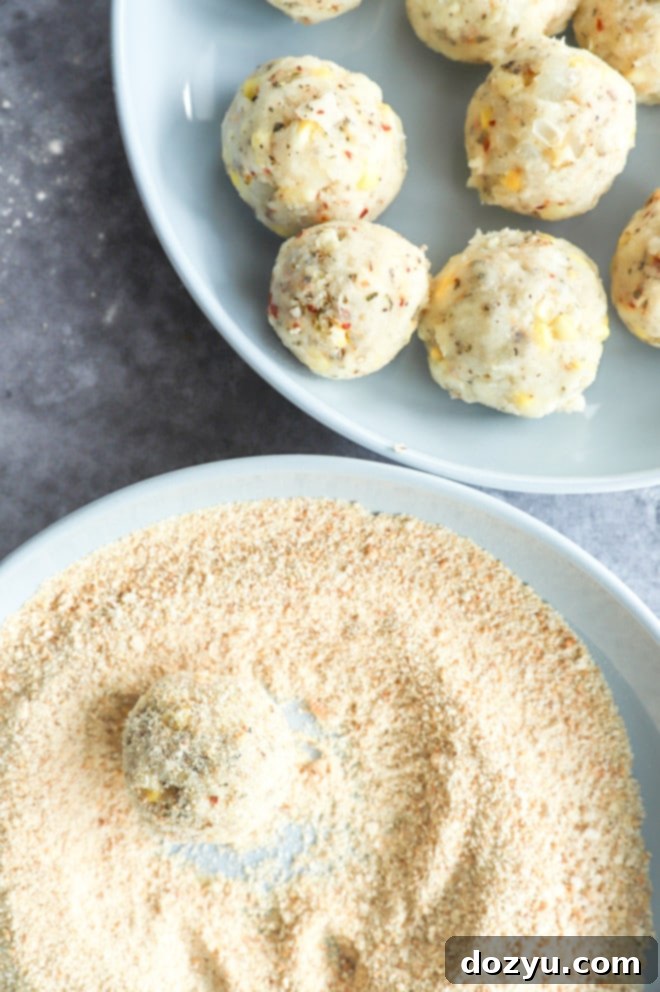
Once formed, gently roll each ball in the plain bread crumbs, ensuring it is thoroughly coated on all sides. This breading layer is what will create that wonderfully crispy exterior when fried.
Fry to Golden Perfection
Once your oil has reached the target temperature and your corn balls are coated, it’s time to fry. Carefully add the breaded balls to the hot oil in batches. Avoid overcrowding the pot, as this can lower the oil temperature and result in greasy, less crispy balls. Fry each batch for about 5 minutes total, or until they turn a beautiful golden brown and are crispy all over. Be sure to flip them halfway through cooking to ensure even browning on all sides.
Using a spider strainer, carefully remove the fried cheese corn balls from the oil and transfer them to a plate generously lined with paper towels. The paper towels will absorb any excess oil, ensuring your corn balls remain wonderfully crispy, not greasy. Immediately sprinkle the hot balls with flaky salt for an extra touch of flavor and texture. Serve these delightful snacks warm with your favorite dipping sauce!
Craving more fantastic fried appetizers? Be sure to check out these irresistible recipes: BBQ Fried Mac n Cheese Balls | Berbere Fried Ravioli | Jalapeño Avocado Cream Cheese Wontons | Grilled Vegetable Egg Rolls | Potato Cheese Balls | Cheese Croquettes

Expert Tips and Ideas for Perfect Corn Balls
Achieving perfectly crispy and flavorful cheese corn balls is easy with these helpful tips:
- Grease Your Hands: To make the ball-forming process significantly easier and less messy, lightly coat your hands with olive oil or cooking spray before handling the mixture. This simple trick prevents the sticky potato and corn mixture from adhering to your palms, allowing for quicker and smoother shaping.
- Drain on Paper Towels: Always have a plate or baking sheet lined with several layers of paper towels ready before you start frying. Immediately transferring the freshly fried corn balls to these paper towels allows excess oil to drain away, ensuring they remain wonderfully crispy and less greasy.
- Watch for Oil Splatter: Be aware that fresh corn kernels can sometimes burst when exposed to hot oil due to their moisture content. Keep a close eye on the oil while frying and maintain a safe distance. Consider using a splatter screen if you have one, or a lid slightly askew to prevent excessive splattering.
- Maintain Oil Temperature: Use a kitchen thermometer to keep your oil between 350˚F and 375˚F. If the oil is too cool, the balls will absorb too much oil and become greasy. If it’s too hot, they’ll brown too quickly on the outside, leaving the inside uncooked. Frying in small batches also helps maintain a consistent temperature.
- Season Your Breadcrumbs: For an extra layer of flavor, consider mixing a pinch of garlic powder, onion powder, or paprika into your plain bread crumbs before coating the balls. This subtle addition can elevate the overall taste.
- Test a Single Ball: Before frying an entire batch, fry just one cheese corn ball as a test. This allows you to check if the oil temperature is correct, if the mixture holds together well, and if the seasoning is to your liking. Adjust as necessary before proceeding with the rest.
Can I Use a Different Kind of Cheese?
Absolutely! While shredded mozzarella is fantastic for its creamy texture and excellent melt, you can certainly experiment with other cheeses to customize the flavor of your corn balls. Here are a few delicious alternatives that pair wonderfully with the other ingredients:
- Pepper Jack: If you enjoy a bit of heat, pepper jack cheese will add a delightful spicy kick to your corn balls, complementing the sweetness of the corn beautifully.
- Colby Jack: For a slightly sharper, yet still mild and melty, flavor profile, Colby Jack is a great choice. It offers a lovely creamy texture with a bit more character than mozzarella.
- Monterey Jack: Similar to mozzarella in its excellent melting qualities, Monterey Jack provides a creamy, buttery flavor that works wonderfully in this recipe without being too overpowering.
- Sharp Cheddar: If you prefer a bolder, more pronounced cheese flavor, sharp cheddar will add a rich, tangy depth to your cheese corn balls. Ensure it’s finely shredded for optimal melting.
When selecting an alternative, consider cheeses that melt well to ensure that delightful gooey center. These options will all meld beautifully with the savory potato and sweet corn, offering a unique twist on the classic.
Do I Have to Fry These Cheese Corn Balls?
While deep frying yields the crispiest and most traditional result, you certainly don’t have to limit yourself to that method! For those seeking alternative ways to cook these delicious cheese corn balls, there are two excellent options:
Air Frying for a Lighter Crisp
Air frying is a fantastic way to achieve a similar crispy exterior with significantly less oil, making it a popular choice. To air fry your cheese corn balls:
- Lightly grease the basket or insert of your air fryer. A quick spray of cooking oil works perfectly.
- Once the corn balls are formed and rolled in bread crumbs, arrange them in a single layer in the air fryer basket, ensuring they are not touching. You may need to work in batches, depending on the size of your air fryer, to avoid overcrowding.
- Cook the cheese corn balls at 350˚F (175˚C) for approximately 15 minutes.
- Halfway through the cooking time (around 7-8 minutes), pause the air fryer and gently flip the balls to ensure even browning and crispiness on all sides. Continue cooking until they are golden brown and heated through.
Baking for a Gentle Golden Finish
Baking is another great option that offers a more hands-off approach and a slightly softer, yet still satisfying, crust:
- Preheat your oven to 375˚F (190˚C).
- Line a baking sheet with a silicone mat or parchment paper to prevent sticking.
- Place the breaded corn balls on the prepared baking sheet, making sure to space them apart so they don’t touch, allowing for even circulation of heat.
- Bake for 15 to 20 minutes.
- Just like with air frying, flip the balls halfway through the baking time to promote even golden-brown coloring and ensure they cook thoroughly. Continue baking until they are golden and heated through.
Both air frying and baking offer delicious, albeit slightly different, results from deep frying, allowing you to choose the method that best suits your preferences and equipment.

Can I Use Frozen or Canned Corn?
Absolutely! While fresh corn offers a delightful crispness and natural sweetness that I particularly love, you can certainly use frozen or canned corn in this recipe without compromising on flavor or texture. The key is proper preparation for each type:
- For Frozen Corn: If opting for frozen corn, first ensure it is completely thawed. You can do this by letting it sit at room temperature, or by rinsing it under cool water. After thawing, it’s crucial to drain any excess water thoroughly. Then, pat the corn kernels completely dry with paper towels. Removing as much moisture as possible is vital to prevent the mixture from becoming too wet and to reduce oil splatter if you are frying.
- For Canned Corn: When using canned corn, begin by draining it completely from its canning liquid. Rinse the kernels under cold water to remove any residual sodium or metallic taste. Just like with frozen corn, pat the kernels thoroughly dry with paper towels before adding them to your potato mixture. This step is essential to maintain the desired consistency of the corn ball mixture and ensure crispy results.
In both cases, when using frozen or canned corn, you can skip the initial step of cooking the corn cob in the Instant Pot, saving you even more time.
Can I Make This Recipe Ahead of Time?
Yes, these cheese corn balls are fantastic for making ahead, which makes them perfect for entertaining or meal prep! Here’s how you can prepare and store them:
Preparing Ahead (Uncooked)
If you want to prepare a large batch in advance and cook them fresh later, follow these steps:
- Prepare the corn ball mixture and form them into balls as instructed. Do not roll them in breadcrumbs yet.
- Arrange the uncooked balls on a baking sheet lined with parchment paper, ensuring they don’t touch.
- Freeze the baking sheet for a few hours until the balls are solid.
- Once frozen, transfer the solid cheese corn balls to a resealable freezer bag or an airtight container. They can be stored in the freezer for up to 3 months.
- When you’re ready to cook them, you have a couple of options for thawing:
- Thaw them overnight in the refrigerator.
- Thaw them at room temperature on the countertop for about an hour before frying.
- Once thawed, proceed with rolling them in breadcrumbs and frying (or air frying/baking) as per the recipe instructions. This method allows for a freshly cooked, crispy snack whenever you desire.
Storing Leftovers (Cooked)
If you have any cooked cheese corn balls leftover (though that’s a rare occurrence!), proper storage and reheating will help maintain their quality:
- Allow the cooked corn balls to cool completely to room temperature. This prevents condensation which can make them soggy.
- Place them in an airtight container and store them in the refrigerator for up to 2 days.
- For reheating, the best method to regain some crispiness is to use an oven or an air fryer. Reheat in the oven at about 350˚F (175˚C) for 5-10 minutes, or in an air fryer at 325°F (160°C) for 3-5 minutes, until warmed through and crisp again.
- While you can microwave them, the texture won’t be as good; they might lose their crispiness and become a bit softer.
Need more inspiration for appetizers? Check out my appetizer recipes page!

What to Serve with Cheese Corn Balls
These versatile cheese corn balls are a fantastic canvas for a variety of accompaniments, enhancing their already delicious flavor. Here are some of my favorite ways to serve them:
Dipping Sauces:
Dipping sauces are a must for these crispy treats! You can go classic or get creative:
- Classic Favorites: Simple ketchup, creamy ranch dressing, or a tangy secret sauce (like that famous chicken chain’s special recipe!) are always crowd-pleasers.
- Homemade Aioli: Elevate your dipping experience with a homemade aioli. A zesty garlic aioli adds a pungent kick, while a rich roasted garlic aioli offers a deeper, sweeter garlic flavor. For those who love a bit of spice, a smoky chipotle aioli is perfect, and a savory bacon aioli provides an indulgent, umami-rich option.
Sweet & Savory Drizzles:
For an unexpectedly delicious twist, try drizzling the hot cheese corn balls with honey or hot honey. The combination of sweet and salty, with a hint of spice from the hot honey, creates an utterly irresistible flavor profile that will surprise and delight your guests.
Cocktail Pairings:
If you’re serving these cheese corn balls at a gathering, pairing them with a refreshing cocktail can really enhance the experience. Consider these summery sips:
- A light and invigorating watermelon vodka cocktail is the perfect companion, offering a refreshing contrast to the savory snack.
- For a balanced and elegant choice, this lavender lemonade cocktail strikes just the right note of sweet, tart, and floral.
- Or, for effortless patio sipping, whip up a big batch of the best homemade vodka lemonade – a classic that never disappoints.
These cheese corn balls are also an excellent addition to any party platter. For more inspiration, explore our collection of New Year’s Eve appetizers – because delicious party foods aren’t just for one night of the year!
How to Store Cheese Corn Balls
Proper storage is key to enjoying your delicious cheese corn balls long after they’re cooked, or to prepare them in advance. Here’s a comprehensive guide:
Storing Cooked Leftovers:
- Cool Completely: Before storing any cooked cheese corn balls, ensure they have cooled down completely to room temperature. Storing them while warm can lead to condensation, which will make them soggy.
- Refrigerate: Place the cooled corn balls in an airtight container. They will keep well in the refrigerator for up to 2 days. For best texture, avoid stacking them too tightly, if possible.
- Reheat for Best Results: To bring back their crispy texture, reheat cooked leftovers in an oven or an air fryer. Preheat your oven to 350˚F (175˚C) and warm them on a baking sheet for about 5 to 10 minutes, or until heated through and crisp. In an air fryer, cook at 325°F (160°C) for 3-5 minutes, flipping once. Microwaving is not recommended as it will result in a soft, less appealing texture.
Freezing for Future Enjoyment (Uncooked):
Freezing the cheese corn balls before cooking is an excellent way to prepare them ahead of time for quick snacks or future gatherings:
- Form and Freeze: Prepare the recipe by shaping the corn mixture into balls as instructed, but do not roll them in breadcrumbs yet. Arrange the uncooked balls on a baking sheet lined with parchment paper, ensuring they do not touch. Place the baking sheet in the freezer until the balls are completely frozen solid (typically 2-3 hours).
- Store Frozen: Once frozen, transfer the solid balls into a heavy-duty resealable freezer bag or an airtight freezer-safe container. Label with the date. They can be stored in the freezer for up to 3 months.
- Thaw and Cook: When you’re ready to enjoy them, thaw the frozen balls at room temperature for about one hour, or overnight in the refrigerator. Once thawed, roll them in breadcrumbs and then fry, air fry, or bake according to the recipe instructions. This ensures a fresh-tasting, crispy snack every time.

More Delicious Corn Recipes
If you love the sweet and savory notes of corn as much as we do, here are some other fantastic corn-centric recipes to try:
- For an exceptional side dish to your favorite summer BBQ recipes, this blackened corn is an absolute must-try. Its smoky, charred flavor is simply irresistible.
- Experience corn elevated to a gourmet level in this creamy and comforting summer corn tomato risotto. It’s a hearty and flavorful main course.
- Make your grilled salmon even more incredible by smothering it in a vibrant charred corn tomato salsa. This fresh topping adds brightness and texture.
Finally, if you whip up these incredible cheese corn balls using this recipe, please consider leaving a rating and/or a comment below! I absolutely adore hearing about your cooking adventures and I make sure to respond to every single comment. Feel free to ask any questions you might have about the recipe, too.
And don’t forget to tag me on Instagram if you share your culinary creations! Seeing these delicious recipes come to life in your homes is truly my favorite part of this whole process – it means the world to me!

Cheese Corn Balls Recipe
Equipment
-
Instant Pot DUO (or similar electric pressure cooker for efficient cooking)
-
Instant Pot Ultra
-
Instant Pot Max
-
Mixing Bowls (various sizes for prep and mixing)
-
Measuring Spoons (for accurate spice measurements)
-
Wooden Spoon or Sturdy Spatula (for mixing)
-
Dutch Oven or other heavy-duty pot (for deep frying)
-
Spider Strainer (for safe removal from hot oil)
Ingredients
- 1 large russet potato peeled, about 10-12 oz
- 1 large corn cob (or 1 cup frozen/canned corn, thawed and drained)
- 1/2 cup shredded mozzarella cheese (or other good melting cheese)
- 1/2 tsp black pepper
- 1/2 tsp salt (plus flaky salt for finishing)
- 1 tsp dried oregano
- 1/2 tsp garlic powder
- 1/2 tsp dried basil
- 1/2 tsp red chili pepper flakes (or more if you like it spicy!)
- 1/4 cup all-purpose flour (or gluten-free 1:1 flour)
- 1 cup plain bread crumbs (or Italian/gluten-free bread crumbs)
- Canola or Vegetable Oil for deep frying
Instructions
-
Add 2 cups of water to the insert of an electric pressure cooker or Instant Pot. Place the trivet inside, then carefully place the peeled potato and corn cob (if using fresh) on top. Cook for 15 minutes on High pressure. Allow the pressure to naturally release for 5 minutes, then manually release any remaining pressure. If using frozen or canned corn, skip this step for the corn.
-
Remove the cooked potato and corn cob (if used) to let them cool slightly. Once cool enough to handle, use a sharp knife to remove the corn kernels from the cob. Add the potato to a large bowl and mash thoroughly with the back of a fork or potato masher until smooth and lump-free.
-
To the mashed potato, add the corn kernels (fresh, or thoroughly thawed/drained frozen/canned), shredded cheese, black pepper, salt, dried oregano, garlic powder, dried basil, red chili pepper flakes, and all-purpose flour. Stir everything together until all ingredients are well combined and the mixture is uniform.
-
Pour canola or vegetable oil into a heavy-duty pot or Dutch oven, ensuring it is about 3 inches deep. Heat the oil over medium-high heat until it reaches a temperature of 350˚F – 375˚F (175˚C – 190˚C). Use a kitchen thermometer to monitor the oil temperature accurately.
-
Lightly grease your hands with olive oil or cooking spray. Take portions of the corn potato mixture and roll them into uniform balls, approximately 1 to 2 inches in diameter. This greasing step prevents sticking and makes shaping easier.
-
Place the plain bread crumbs in a separate shallow dish. Roll each formed ball thoroughly in the bread crumbs, ensuring an even coating on all sides.
-
Carefully add the breaded balls to the hot oil in batches, being careful not to overcrowd the pot. Fry them for about 5 minutes total, flipping them halfway through, until they are beautifully golden brown and crispy all over.
-
Using a spider strainer, remove the fried cheese corn balls from the oil and transfer them to a plate or baking sheet lined with paper towels to drain excess oil. Immediately sprinkle with flaky salt for enhanced flavor and texture.
-
Serve these irresistible cheese corn balls warm with your favorite dipping sauce(s) or a drizzle of honey.
