Delicious & Safe: The Ultimate No-Bake Edible Cookie Dough Bites Recipe
Indulge in the pure bliss of cookie dough without any of the worries! These incredibly soft, chewy, and rich cookie dough bites are the perfect treat, packed with chocolate chips and often dipped in an extra layer of luscious chocolate. The best part? They’re completely safe to eat raw, as they contain no eggs and use heat-treated flour. Get ready for the ultimate cookie dough experience – a truly irresistible homemade delight that everyone will adore!

table of contents
Toggle
About These No-Bake Cookie Dough Bites
There’s something uniquely comforting and utterly delicious about eating cookie dough straight from the bowl. For many, it evokes childhood memories of baking with family, even if we were always told not to lick the spoon! These chocolate chip cookie dough bites capture that nostalgic flavor and irresistible texture, but with one crucial difference: they are completely safe to enjoy raw. My husband, son, and I simply can’t get enough of them!
Having a batch of these delectable treats chilling in the refrigerator is a game-changer. They serve as the perfect quick dessert for any sweet craving, but they’re also an incredibly easy recipe to whip up for a party or unexpected guests. When I say these cookie dough bites taste exactly like real cookie dough, I truly mean it. The tender, soft, and chewy texture, combined with the classic flavor profile and generous bursts of chocolate, mirrors that spoonful of deliciousness straight from the mixing bowl, but without the risks associated with raw eggs and untreated flour.
Unlike traditional cookie dough, which contains raw eggs that can pose a risk of salmonella, and raw flour which can contain harmful bacteria like E. coli, these bites are crafted with safety in mind. The flour is heat-treated to eliminate any potential pathogens, and eggs are simply not part of the recipe. This means you can indulge freely and guilt-free!
While delicious on their own, these bites are elevated when dipped in chocolate. You can coat them fully, drizzle them elegantly, or omit the extra chocolate entirely if you prefer a simpler taste. They are a fantastic solution for a weeknight sweet tooth, a fun midnight snack, or an ultimate party pleaser that will have everyone asking for the recipe. I often find myself stashing them in the back of the fridge – because, let’s be honest, sometimes you need to hide the best treats for yourself, especially when little hands are around!
For an extra touch of gourmet sophistication, consider sprinkling a pinch of flaky sea salt over the dark chocolate coating immediately after dipping. The delightful contrast of sweet and salty creates an explosion of flavor that will truly take these cookie dough bites over the top!
Moreover, these edible cookie dough bites are incredibly versatile and can easily be made vegan. By simply swapping out dairy butter, milk, and chocolate for their vegan counterparts, you can create a delicious plant-based treat that caters to all dietary preferences.

Are Cookie Dough Bites Safe to Eat?
Absolutely, yes! These homemade cookie dough bites are designed to be entirely safe for raw consumption. The primary concerns when eating raw cookie dough are the presence of uncooked eggs and untreated flour. This recipe meticulously addresses both: it contains no eggs whatsoever, and the flour undergoes a crucial heat-treating process before being incorporated into the dough.
Many people are aware of the risks associated with raw eggs, such as salmonella. However, it’s less commonly known that raw flour can also harbor harmful bacteria, including E. coli, which can lead to serious illness. These bacteria can be introduced to flour during the grain harvesting and milling processes. Therefore, consuming raw flour in any form is not recommended.
By following the simple but vital step of heat-treating the flour, we effectively kill off any potential bacteria, making the flour safe for raw consumption. This meticulous approach ensures that every bite of this delicious cookie dough is not only enjoyable but also completely worry-free.
How Do I Heat Treat Flour?
Heat-treating flour is a straightforward process that significantly enhances the safety of edible raw doughs. It essentially means gently cooking the flour on its own to eliminate any potential harmful bacteria. While it might seem like an extra step, it’s a quick and essential measure for peace of mind, allowing you to enjoy your cookie dough bites without any health concerns.
Here’s how to do it in the oven:
- Preheat your oven to 350˚F (175˚C).
- Spread the desired amount of all-purpose flour in a thin, even layer across a rimmed baking sheet. The rim ensures the flour stays contained.
- Bake the flour for approximately 7 to 10 minutes. This duration is usually sufficient to bring the flour to a safe temperature without browning it.
- Once baked, remove the baking sheet from the oven and allow the flour to cool completely to room temperature before using it in your recipe. This step is critical, as hot flour can alter the texture of your dough by melting the butter.
Alternatively, you can also heat treat flour using a microwave, which can be even quicker if you’re in a rush. For microwave instructions, refer to the “Tips for Success” section below. Regardless of the method, cooling the flour completely is paramount to ensure the optimal texture of your cookie dough.
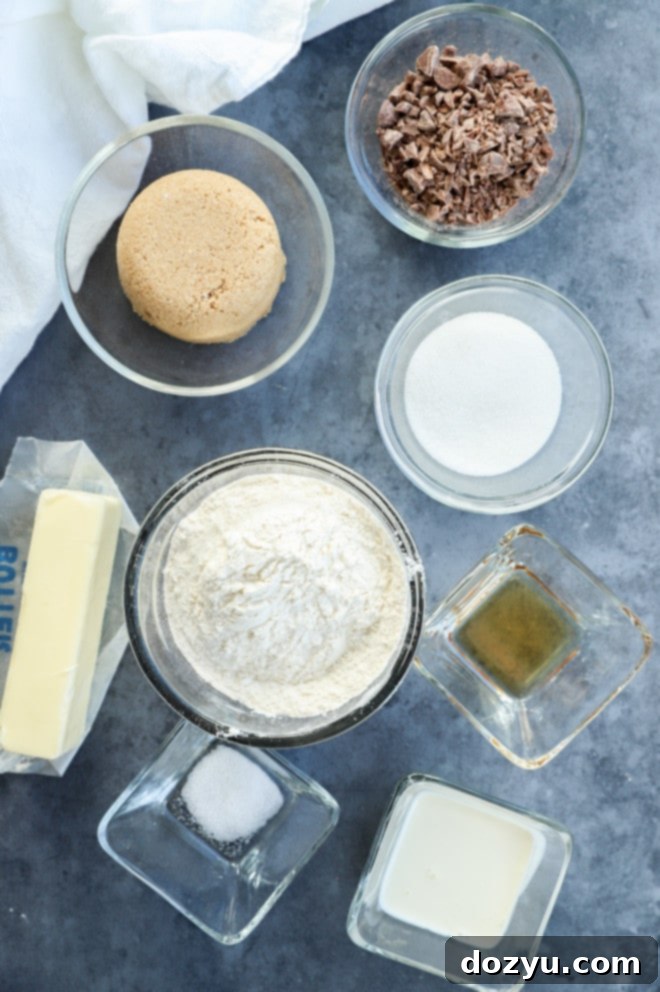
Essential Ingredients for Perfect Cookie Dough Bites
Crafting these delectable no-bake cookie dough bites requires a few simple, high-quality ingredients that come together to create that irresistible classic flavor:
- Butter: I always opt for unsalted butter in this recipe. Using unsalted butter gives you precise control over the overall saltiness of your dough. If you only have salted butter on hand, that’s perfectly fine – just be sure to omit the additional salt called for in the recipe to prevent it from becoming too salty. For a vegan version, a high-quality vegan butter substitute works beautifully, and further details can be found in the FAQs below.
- Sugars: This recipe benefits from a blend of two types of sugar. You’ll need both light brown sugar and granulated sugar. The brown sugar contributes to that signature chewy texture and deep, molasses-like flavor, while the granulated sugar provides essential sweetness and a slight crispness if the bites are chilled.
- Salt: Fine kosher salt is my preferred choice for enhancing the flavors in this recipe. It balances the sweetness and brings out the depth of the chocolate and vanilla. As mentioned, if you’re using salted butter, remember to skip adding any extra salt.
- Heavy Cream: Heavy cream adds richness and helps bind the dough, contributing to its smooth, soft consistency. While heavy cream is ideal for its luxurious mouthfeel, whole milk can also be used as a suitable alternative if preferred. Don’t forget, there’s also an option to make this recipe completely vegan by using a plant-based milk (see the FAQs).
- Vanilla Extract: High-quality vanilla extract is paramount here, as it’s a key flavor component. It dramatically elevates the overall taste profile, bringing warmth and depth. I highly recommend using a premium brand like Nielsen-Massey’s Madagascar Bourbon Pure Vanilla Extract for its exceptional aroma and flavor, which truly makes a difference in any baked or no-bake treat.
- Flour: All-purpose flour is the base of our cookie dough. However, it is absolutely crucial to heat treat the flour as instructed earlier and in the recipe card before adding it to the mixture. This step is non-negotiable for ensuring the safety of your edible cookie dough.
- Chocolate: The beauty of these bites lies in the chocolate! For the dough itself, I love to use chopped milk chocolate chips, aiming for smaller pieces to ensure bursts of chocolate in every bite. For dipping the finished balls, dark chocolate chips offer a lovely contrast and richness, but you can certainly use milk chocolate, white chocolate, or even a mix. If you prefer not to chop, mini chocolate chips are a fantastic convenient option for mixing into the dough. Feel free to customize your chocolate experience to your liking!

Essential Tools: This Recipe’s Must-Haves
One of the great advantages of making these no-bake cookie dough bites is that they don’t require an extensive array of specialized kitchen equipment. Most of what you need are common baking tools you likely already own:
- Rimmed Half Sheet Baking Pan: This is essential for heat-treating your flour safely and effectively. The rim prevents the flour from spilling in the oven, and the flat surface allows for an even layer, ensuring consistent heat distribution. It will also be useful for chilling your formed cookie dough balls.
- Stand Mixer with Paddle Attachment (or Hand Mixer): While you can technically mix the dough by hand, a stand mixer or a powerful hand mixer will make the process significantly easier and ensure a perfectly fluffy and well-combined dough. The paddle attachment is ideal for creaming butter and sugar without incorporating too much air.
- Microwave-Safe Bowl: If you plan to dip your cookie dough bites in chocolate, a sturdy microwave-safe bowl is indispensable for melting the chocolate chips smoothly and gradually.
- Fork or Dipping Tools: For dipping the cookie dough balls into melted chocolate, a simple fork works wonders. The tines allow excess chocolate to drip off easily, resulting in a smooth, even coating. Alternatively, specialized dipping tools can also be used for a professional finish.
- Parchment Paper: This non-stick surface is crucial for lining your baking sheets. It prevents the cookie dough from sticking, whether you’re cooling the heat-treated flour, chilling the rolled balls, or setting the chocolate-dipped bites.
- Spatula: A flexible spatula is handy for scraping down the sides of the mixing bowl, ensuring all ingredients are fully incorporated, and for handling the dough.
- Measuring Spoons and Measuring Cups: Accurate measurements are key to successful baking and no-bake recipes. Ensure you have a full set of both for precise ingredient portions.
Having these basic tools ready will streamline your preparation process, allowing you to focus on the fun of creating and enjoying these delightful cookie dough bites.
Here’s How to Make Irresistible Cookie Dough Bites
Making these no-bake cookie dough bites is a surprisingly simple and rewarding process. Follow these steps to create perfectly safe and delicious edible cookie dough truffles:
Step 1: Heat Treat the Flour
Before anything else, ensuring the flour is safe for raw consumption is the most important step. Preheat your oven to 350˚F (175˚C). Spread the all-purpose flour evenly in a thin layer on a rimmed baking sheet. Bake for 7 to 10 minutes. The goal is to heat it thoroughly without browning it. Once out of the oven, allow the flour to cool completely to room temperature. This cooling step is critical; using warm flour will melt the butter in your dough and compromise the texture.
Step 2: Prepare the Dough Base
In the bowl of a stand mixer fitted with the paddle attachment (or using a hand mixer), combine the softened unsalted butter, light brown sugar, granulated sugar, and salt. Beat these ingredients on medium speed until the mixture becomes light, fluffy, and pale in color, typically for about 3 to 4 minutes. This creaming process incorporates air, which contributes to the soft texture of the dough. Next, add the heavy cream and vanilla extract, beating just until they are combined. Overmixing at this stage can make the dough tough.
With the mixer running on low speed, gradually add the completely cooled, heat-treated flour. Mix only until the flour is just combined and no dry streaks remain. Be careful not to overmix. Finally, fold in your chopped milk chocolate chips using a spatula. This gentle folding ensures the chocolate is evenly distributed without crushing it.
Once the dough is ready, use a spoon or a small cookie scoop to portion out the dough, about 1 ½ to 2 tablespoons at a time. Roll each portion into smooth, round balls between your palms. Achieving a smooth, uniform shape not only makes them visually appealing but also ensures a nicer finish if you plan to dip them in melted chocolate. Place the rolled cookie dough balls onto a sheet pan lined with parchment paper.

Step 3: Add Chocolate Coating (Optional)
If you choose to add a chocolate coating, place your dark chocolate chips (or your preferred type of chocolate) in a microwave-safe bowl. Microwave in 30-second intervals, stirring thoroughly after each interval, until the chocolate is completely melted and smooth. Be cautious not to overheat the chocolate, as it can seize and become unusable. Stirring frequently helps distribute the heat and prevents burning.
Carefully dip each cookie dough truffle into the melted chocolate, ensuring it’s fully coated. Lift the truffle out with a fork, allowing any excess chocolate to drip back into the bowl. This prevents puddles of chocolate at the base. Place the dipped truffles back onto the parchment-lined baking sheet.
For a lighter touch, you can opt to drizzle the chocolate instead. Simply transfer the melted chocolate into a small Ziploc bag, snip off a tiny corner, and artfully drizzle the chocolate over the tops of the remaining cookie dough bites. This creates a beautiful, elegant finish.
Once dipped or drizzled, place the sheet of truffles in the freezer for about 5 minutes. This quick chill time helps the chocolate set rapidly, giving you perfectly firm and mess-free cookie dough bites ready for enjoyment.

Tips for Success with Your Cookie Dough Bites
Achieving perfect, consistently delicious cookie dough bites is easy with a few key tips:
- Avoid Dry Dough: If your cookie dough feels too dry, crumbly, and difficult to roll into smooth balls, it likely needs more moisture. This can happen if your flour was measured too generously or if the environment is particularly dry. The simple fix is to add more heavy cream or milk, starting with 1 teaspoon at a time. Mix it in thoroughly before adding more, continuing until the dough reaches a pliable, moist consistency that holds its shape well when rolled.
- Experiment with Chocolate Variations: Don’t limit yourself to just milk chocolate chips!
- **For the Dough:** Try incorporating chopped dark chocolate, white chocolate chips, or even a blend of different chocolate types into the dough. Mini chocolate chips are fantastic for ensuring chocolate in every tiny bite.
- **For the Coating:** Experiment with dipping the finished bites in milk chocolate, white chocolate, or even a flavored chocolate. A sprinkle of colorful sprinkles or chopped nuts on the wet chocolate coating can also add visual appeal and extra crunch.
- Make Ahead for Convenience: These cookie dough bites are an ideal make-ahead dessert, perfect for busy hosts or meal prep. They hold up incredibly well! Prepare them entirely, including the chocolate coating, and store them in an airtight container in the refrigerator for up to 7 days. This makes them a fantastic option for parties, gatherings, or just having a sweet treat readily available throughout the week. You can also freeze them for even longer storage (see storage instructions for details).
- Microwave Heat Treatment for Speed: If you’re short on time and prefer not to use the oven, heat-treating your flour in the microwave is a perfectly viable alternative. To do this, place the desired amount of all-purpose flour in a microwave-safe bowl. Heat it on high power for 60 seconds. Remove, stir the flour thoroughly to distribute the heat evenly, then microwave for another 60 seconds. Allow it to cool completely before incorporating it into your recipe. Always ensure the flour cools down completely to avoid melting your butter.
- Chill Time is Your Friend: While “no-bake” implies immediate gratification, a brief chill time can significantly improve the texture and handling of your cookie dough bites. After rolling them into balls, if you’re not dipping them in chocolate immediately, place them in the refrigerator for 10-15 minutes. This firms them up, making them easier to handle and preventing them from becoming too soft from the warmth of your hands.
Got a craving for cookies? Check out these other delightful recipes: Peanut Butter Oatmeal Cookies | Sea Salt Pistachio Dark Chocolate Cookies | Easy Pantry Cookies | Lemon Lavender Shortbread Cookies

Do I Have to Use Chocolate Chips in My Cookie Dough Bites?
Not at all! While chocolate chips are a classic and delicious addition to edible cookie dough, they are completely optional, and you have plenty of room to customize. If you’re not a fan of chocolate or simply want to try something different, feel free to omit them entirely. Instead of chocolate chips, you could mix in other delightful additions such as:
- Chopped Nuts: Almonds, walnuts, pecans, or even peanuts can add a wonderful crunch and nutty flavor.
- Sprinkles: For a fun, colorful, and festive touch, especially for parties or holidays, a generous mix of sprinkles works wonders.
- Toffee Bits: These add a buttery, caramel-like flavor and a satisfying chew.
- White Chocolate Chips: A sweeter, creamy alternative to milk or dark chocolate.
- Dried Fruit: Mini dried cranberries or cherries can offer a tart counterpoint to the sweetness.
Feel free to get creative and tailor these cookie dough bites to your personal preferences or the occasion!
Can I Skip Dipping Them in Chocolate?
Absolutely, you can! These edible cookie dough bites are incredibly delicious and satisfying even without an outer chocolate coating or drizzle. Many prefer them simply as plain cookie dough balls, allowing the rich, buttery, and vanilla-infused dough flavor to shine on its own. The addition of chocolate for dipping is purely an optional step to enhance their decadence and aesthetic appeal.
If you decide to skip the dipping process, I highly recommend a brief chilling period after you’ve rolled the dough into balls. The warmth from your hands during the rolling process can slightly soften the dough. Placing the formed balls in the refrigerator for about 5 to 10 minutes will allow them to firm up again. This ensures they maintain their shape, have a more pleasant texture, and are less likely to fall apart when you pick them up to enjoy.
Why Is My Cookie Dough Dry?
If you find your edible cookie dough to be dry, crumbly, or not holding its shape well, the most common culprit is usually too much flour. This often happens inadvertently when measuring flour, especially if it’s scooped directly from the bag rather than spooned and leveled. Excess flour absorbs too much moisture, leading to a stiff and dry dough consistency.
The good news is that this is an easy fix! To restore your cookie dough to its perfect, moist texture, simply add a small amount of additional heavy cream or milk. Start with just 1 teaspoon at a time, mixing thoroughly after each addition. Continue adding and mixing until the dough becomes soft, pliable, and easy to roll into balls again. This gradual approach prevents you from accidentally adding too much liquid and making the dough too sticky.
Do I Have to Heat Treat the Flour?
Yes, absolutely! Heat-treating the flour is not an optional step; it is a critical safety measure for this edible cookie dough recipe. Raw flour, much like raw eggs, can contain harmful bacteria such as E. coli. These bacteria are naturally present in the environment where grains are harvested and processed, and they are not destroyed until the flour is cooked or heat-treated.
By briefly baking or microwaving the flour as instructed, you effectively kill off any potential pathogens, making the flour entirely safe for consumption in its raw form within the cookie dough. Skipping this step would mean you are consuming raw flour, which carries a risk of foodborne illness. For your health and peace of mind, I strongly recommend never skipping this essential step when making edible cookie dough or any raw flour-based treat.
Can These Cookie Dough Bites Be Made Vegan?
Yes, these delicious cookie dough bites are wonderfully adaptable and can absolutely be made vegan! The recipe relies on simple ingredient swaps to transform it into a plant-based treat without compromising on flavor or texture. To make them vegan, you’ll need to use:
- Vegan Butter: Replace regular unsalted butter with an equal amount of your favorite plant-based butter alternative. There are many excellent brands available that perform very similarly to dairy butter in baking and no-bake recipes.
- Vegan Milk/Cream: Instead of heavy cream, opt for a full-fat plant-based milk or cream, such as unsweetened almond milk, oat milk, or cashew cream. Ensure it’s thick enough to maintain the dough’s consistency.
- Vegan Chocolate: Choose chocolate chips or bars that are specifically labeled as vegan. Most dark chocolates are naturally dairy-free, but always double-check the ingredient list. Milk and white vegan chocolate alternatives are also widely available.
By making these simple substitutions, you can create a batch of delightful vegan cookie dough bites that are safe and enjoyable for everyone, including those with dairy allergies or following a plant-based diet.
Do I Have to Refrigerate These Bites?
Yes, refrigeration is highly recommended for these cookie dough bites, especially for optimal texture and extended freshness. While they don’t contain raw eggs, they do contain dairy ingredients like butter and heavy cream, which are best stored chilled. Storing them in the refrigerator helps maintain their firm, chewy texture and prevents them from becoming too soft or melting, particularly if they are coated in chocolate.
When you remove the cookie dough balls from the fridge, they might be quite firm due to the cold butter. If you prefer a softer, more pliable texture closer to freshly made dough, simply let them sit at room temperature for about 10 to 15 minutes before indulging. This allows the butter to soften slightly, bringing them to the perfect consistency for eating. Always store any leftovers in an airtight container to keep them fresh and prevent them from absorbing other odors from the refrigerator.
Need more inspiration for dessert? Check out my desserts recipe page!

How to Store and Freeze Your Edible Cookie Dough Bites
These edible cookie dough bites are not only delicious but also incredibly convenient to prepare in advance and store for later enjoyment. Proper storage ensures they remain fresh and maintain their delightful texture.
Storing in the Refrigerator:
Once your cookie dough bites are made and the chocolate coating (if used) has set, transfer them to an airtight container. They will stay fresh and delicious in the refrigerator for 5 to 7 days. To prevent the bites from sticking together, especially if they are chocolate-dipped, I recommend arranging them in layers separated by sheets of parchment paper. This simple step keeps them looking pristine and easy to grab.
Freezing for Longer Storage:
These cookie dough bites freeze exceptionally well, making them perfect for future cravings or unexpected guests. If you plan to freeze them, it’s best to freeze them *before* dipping them in chocolate. The chocolate coating can sometimes crack or develop a cloudy appearance after thawing, although it will still be edible.
- Prepare for Freezing: Roll the cookie dough into balls as instructed in the recipe.
- Flash Freeze: Place the raw cookie dough balls in a single layer on a parchment paper-lined baking sheet. Freeze until solid, which typically takes about 2 to 3 hours. This “flash freezing” prevents them from sticking together when transferred to a larger container.
- Long-Term Storage: Once frozen solid, transfer the cookie dough balls to a freezer-safe, airtight container or a heavy-duty freezer bag. They can be stored in the freezer for up to 3 months.
Thawing Frozen Cookie Dough Bites:
When you’re ready to enjoy your frozen cookie dough bites, simply remove them from the freezer and let them thaw at room temperature for 1 to 2 hours. If you wish to dip them in chocolate after thawing, you can do so once they’ve fully softened. Enjoy them as a quick snack or a planned dessert!
Finally, if you make this incredible edible cookie dough recipe, please be sure to give it a rating or leave a comment! I absolutely love hearing when you all try out my recipes and I make an effort to respond to every single comment. Feel free to drop any questions you have below as well!
Oh, and don’t forget to tag me on Instagram, Facebook, or Pinterest if you share your creations! Seeing these recipes come to life in your homes is truly my favorite thing, and I cherish looking through all your photos. It honestly means the world to me!

Irresistible No-Bake Edible Cookie Dough Bites
Equipment
-
7-Speed Hand Mixer or Stand Mixer
-
Large Mixing Bowls
-
KitchenAid Stand Mixer (Optional, for ease)
-
Small Microwave-Safe Bowl
-
Parchment Paper or Silicone Baking Mat
-
Rimmed Baking Sheet
Ingredients
- 1/2 cup unsalted butter softened to room temperature
- 3/4 cup packed light brown sugar
- 1/3 cup granulated sugar
- 1/4 tsp fine kosher salt (omit if using salted butter)
- 3 Tbsp heavy cream (or whole milk, or vegan milk)
- 1 tsp high-quality vanilla extract
- 1 1/2 cups all-purpose flour (heat-treated and cooled as instructed)
- 1/2 cup milk chocolate chips chopped into smaller pieces or mini chocolate chips
- 1/3 cup dark chocolate chips melted, for dipping/drizzling*
Instructions
-
Heat Treat Flour: Preheat oven to 350˚F (175˚C). Spread all-purpose flour in an even layer on a rimmed baking sheet. Bake for 7 to 10 minutes, then cool completely before proceeding with the recipe.
-
Prepare Dough: In the bowl of an electric mixer (stand or hand mixer) fitted with the paddle attachment, beat the softened butter, light brown sugar, granulated sugar, and salt until light and fluffy, about 3-4 minutes. Beat in the heavy cream and vanilla extract until just combined. Gradually add the cooled, heat-treated flour while the mixer is running on low speed, mixing until just combined and no dry streaks remain. Fold in the chopped milk chocolate chips using a spatula.
-
Form Balls: Scoop out the dough about 1 ½ to 2 tablespoons at a time and roll into smooth, round balls. Place these formed balls onto a parchment paper-lined baking sheet. For best results, chill the formed balls in the refrigerator for 10-15 minutes if not dipping immediately.
-
Add Chocolate Coating (Optional): Place 1/3 cup dark chocolate chips in a microwave-safe bowl. Microwave in 30-second intervals, stirring well after each, until fully melted and smooth. Dip half of the cookie dough balls into the melted chocolate to coat them completely. Let any excess chocolate drip off, then place them back onto the parchment paper-lined baking sheet. For the remaining bites, you can drizzle the melted chocolate over the tops using a spoon or by transferring the chocolate to a small ziploc bag, snipping a tiny corner, and piping it.
-
Set Chocolate: Place the truffles in the freezer for about 5 minutes, or in the refrigerator for 15-20 minutes, until the chocolate coating is completely set. Enjoy immediately or store as directed below.
