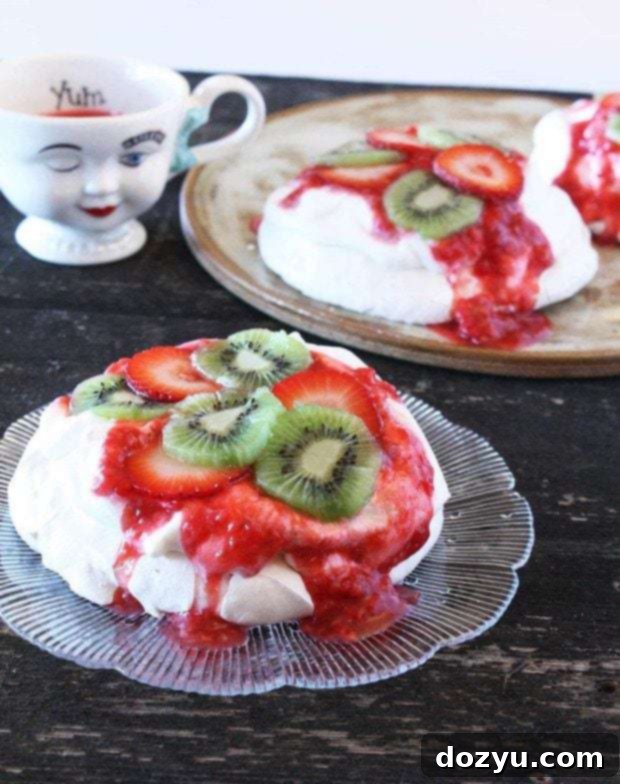
Individual Pavlovas: A Heavenly Dessert Reinvented for Perfect Portions
Growing up, Pavlova held a special place in my heart, and certainly on my palate. It was one of those truly magical desserts that my mom and grandma perfected with such ease, becoming a highly anticipated summer treat. The mere thought of its delicate structure and refreshing taste still brings back a flood of warm, nostalgic memories.
What makes Pavlova so uniquely enchanting? It’s the exquisite balance of textures and flavors. The meringue base boasts a delightful crispness on the outside, giving way to a surprisingly soft, marshmallow-like interior. When this ethereal cloud is generously topped with billowy fresh whipped cream, a sweet-tart raspberry sauce, and an assortment of fresh, vibrant fruits, it transforms into a light, cool, and incredibly creamy dessert. This sophisticated treat truly outshines the heavy, traditional fruit tarts often seen at gatherings, offering a refreshing elegance that’s hard to beat.
The Charm of Individual Pavlovas: No More Messy Slices
While the traditional large Pavlova is undeniably impressive, I vividly recall the challenges it presented. Cutting a clean slice without the delicate meringue crumbling or half the toppings sliding off was an art form in itself – an art form I rarely mastered as a child! It often resulted in a beautiful, yet somewhat messy, plate.
This memory sparked an idea: why not take this beloved classic and reimagine it as smaller, individual pavlovas? This ingenious adaptation means each person gets their very own perfectly portioned dessert. No more wrestling with a giant meringue; just a personal masterpiece of sweet perfection. (You could, of course, share it with someone else, but honestly, who would want to? They’re simply too good to part with!)
Mastering the Meringue: Secrets to Success
To be completely honest, my past attempts at making meringue haven’t always been stellar. It felt like a delicate dance between perfectly stiff peaks and a soupy disaster. This time, however, as I embarked on making these individual pavlovas, I channeled my grandma’s culinary spirit, hoping her legendary touch would guide me.
And indeed, it felt like she was looking over my shoulder! The meringue for these pavlovas came out absolutely beautifully – light, airy, and perfectly structured. While I like to credit my grandma’s spiritual guidance, it could also have been this incredibly helpful visual guide to meringue peaks that I followed meticulously. If you, like me, are sometimes less than 100% confident differentiating between soft peaks, firm peaks, and stiff peaks, I wholeheartedly recommend checking out that guide. It was remarkably easy to follow and gave me the precise visual cues I needed to know exactly when to stop my mixer, ensuring a flawless meringue every time.
Meringue making, while seeming daunting, relies on a few fundamental principles:
- Cleanliness is Key: Ensure your mixing bowl and whisk attachments are immaculately clean and completely free of any grease or egg yolk. Even a tiny speck can prevent your egg whites from whipping up properly.
- Room Temperature Egg Whites: Egg whites separate more easily and whip up to a greater volume when they are at room temperature. Take them out of the fridge about 30 minutes before you plan to start baking.
- Gradual Sugar Addition: Don’t dump all the sugar in at once. Adding it gradually, a tablespoon at a time, allows the sugar to fully dissolve and integrate into the egg whites, resulting in a more stable and glossy meringue.
- Know Your Peaks: This is where the visual guide becomes invaluable. You’ll start with soft peaks (just barely holding their shape), move to firm peaks (holding shape but tips curl slightly), and finally stiff peaks (holding shape firmly, tips stand straight up). For Pavlova, stiff peaks are essential for that characteristic structure.
- Low and Slow Baking: Pavlovas are baked at a low temperature for an extended period, then often cooled in the oven with the door ajar. This prevents cracking and ensures the meringue dries out properly, creating that perfect crisp exterior and chewy interior.
Once you bite into this masterpiece of a dessert, it’s truly impossible not to let out a groan of pure satisfaction. The blend of textures and refreshing flavors is simply divine.
Each spoonful transports me back to those cherished childhood summers. It is every bit as magical as it was when I was just a little first grader, trying it for the very first time. Now, let’s get to creating your own batch of these delightful individual pavlovas.

table of contents
Toggle
Individual Pavlovas
ingredients
- 4 egg whites room temperature
- 1/8 tsp salt
- 1 cup sugar
- 1 tbsp cornstarch
- 4 kiwi thinly sliced
- 1 cup strawberries thinly sliced
- 1 1/2 cups whipping cream I made mine by whipping up 1 cup heavy cream in a blender until it formed soft peaks
- 1 tbsp cornstarch
- 1/2 cup sugar
- 1/2 cup water
- 2 tsp lemon juice
- 2 cups crushed raspberries
instructions
-
Preheat the oven to 400 degrees. To make the pavlova, begin by beating egg whites and salt until soft peaks form. Gradually add sugar and cornstarch until the mixture reaches stiff peaks.
-
Grease a baking sheet (or use a Silpat). Pile the mixture into 4 separate piles on the baking sheet (try to space them out as evenly as you can). Shape each into a circle and don’t spread it too thin (my circles were about 1 inch high). Place in preheated oven and immediately reduce the heat to 250 degrees. Bake until lightly browned and dry to the touch – about 1 hour and 15 minutes. Cool.
-
To make the raspberry sauce, combine all ingredients in a medium saucepan over medium heat. Cook until the sauce boils and thickens. Then remove from heat, cover, and chill completely.
-
Top you pavlovas with whipped cream, raspberry sauce, and sliced fruit. Serve immediately.
Beyond the Recipe: Serving Suggestions and Variations
While the classic combination of whipped cream, raspberry sauce, kiwi, and strawberries is undeniably perfect, don’t hesitate to get creative with your individual pavlovas. This dessert is wonderfully versatile, making it ideal for adapting to seasonal fruits or personal preferences.
Seasonal Fruit Pairings:
- Summer Berries: Think blueberries, blackberries, and red currants for an extra burst of color and flavor.
- Stone Fruits: Sliced peaches, nectarines, or even grilled apricots can add a lovely sweetness and subtle tang.
- Tropical Delights: Mango, passionfruit (especially the pulp with seeds!), or even thinly sliced pineapple can transport your taste buds to a sunny paradise.
- Citrus Zest: A sprinkle of orange or lemon zest over the whipped cream can brighten the whole dessert.
Sauce & Cream Upgrades:
- Lemon Curd: A tangy lemon curd drizzle instead of or in addition to berry sauce offers a delightful contrast.
- Chocolate Drizzle: A light drizzle of dark chocolate ganache can elevate the dessert, especially when paired with raspberries.
- Flavored Whipped Cream: Infuse your whipped cream with a touch of vanilla bean paste, almond extract, or even a hint of espresso powder for added complexity.
- Mascarpone Cream: For a richer, creamier topping, fold some mascarpone cheese into your whipped cream.
Individual pavlovas are also fantastic for entertaining. Set up a “Pavlova Bar” where guests can customize their own with an array of fruits, sauces, and sprinkles. This interactive approach adds a fun element to any gathering, from a casual backyard barbecue to a more formal dinner party.
Final Thoughts on Your Pavlova Journey
Embarking on the journey of making individual pavlovas is a rewarding experience. It’s a chance to connect with a classic dessert, to appreciate the delicate balance of simple ingredients, and to create something truly beautiful. The process of whipping egg whites into glossy, stiff peaks, slowly baking them to perfection, and then assembling them with fresh, vibrant toppings is a culinary meditation.
Whether you’re recreating a cherished family tradition or discovering the joy of Pavlova for the first time, these individual portions offer an elegant and delicious way to indulge. They are proof that some of the best desserts are those that celebrate natural flavors and textures, bringing pure delight with every light, sweet, and fruity bite. So go ahead, whip up a batch, and let these individual pavlovas bring a touch of magic to your table.
